Sunday, January 30, 2011

Birthday Dinner: Course 1, the Main Event: Lamb


As I related my birthday dinner, rack of lamb, to friends and family, I was imagining fruit.  Ripe fruit is naturally perfect.  Imagine a ruby-red strawberry in the peak of summer.  As it sits in your hand, you can tell it is soft, but not yet mushy.  You bite into it.  It does not taste like those freezer-burned, strawberry-flavored ice cubes we call “fresh frozen”; it tastes like cool shade on a hot day.  To call it ‘sweet’ would be irreverent.  The flesh dissolved into syrup on your tongue.  No need for sugar, salt, preservatives….it is perfect.  
Lamb must the ‘fruit’ of red meat, naturally perfect.  Before cooking, we let only fresh herbs and garlic exfoliate the lamb.  Once it hit the hot cast-iron, it sizzled viciously.  We watched the lamb sear to a just-blackened crisp, becoming plump and succulent.  As we gently pressed on the middle, it bulged, impregnated with juices.  Lifted from the scorching skillet, it rested on a red oak cutting board; boldly steaming with fragrant herbs and garlic.  We put it on a plate.  After peeling off the blanket of fat, delicate, purple flesh was revealed.  We tried slicing up the first small bites civilly.  (Eyes roll back into head) The romantic “candlelight dinner” devolved into hedonistic finger-licking and bone-sucking.  We smiled as meaty nectar dribbled from the corner of our mouths.


The best part: we each had two ribs.  The second best part: no mint jelly.   
Lamb, you really are perfect just the way you are. 

Lamb + Marinade
Ingredients:
1 rack of lamb, frenched
4 T Olive Oil
4 cloves garlic, whole
1 T mint leaves, whole
2 sprigs of rosemary
Dash of salt and pepper

Instructions:
1.       Put all ingredients, except the lamb, in food processor.  Blend into light paste. 
2.       Cover each side of lamb rib with marinade. 
3.       Let sit until lamb has been brought to room temperature. 
4.       Heat a cast-iron skillet over high heat until very hot.  Place lamb into skillet
5.       Sear until crisp and just-blackened (about 3 min per side). 
**Meat should be about as tender as the muscle underneath your thumb when you place your thumb and index finger together. 
6.       Let meat rest (covered in tin foil) for about 5-10 minutes.
DEVOUR.  

Thursday, January 27, 2011

Cold Potato Salad


Earlier this week, our heat was shut off because our landlord did not pay the bill.  At 47 degrees inside the house, we don’t even bother taking off our coats or shoes.   Yesterday we opened the doors to heat the house – in January.  On this grey morning, I peddled through low-hanging clouds and a bitterly cold rain even my vintage rubber rain jacket could not shield me from entirely.   Still sopping wet, I made not hot chocolate or steamy soup, but a cold dill potato salad for lunch.  Potato salad seems an odd choice without any picnics, pitch-ins, or warm weather in the foreseeable future.  I blame my subconscious for trying to keep with this week’s theme of “cold”.  The irony made it taste more satisfying.
Some people have this general aversion to mayonnaise.  Reasons vary from health concerns to taste, but some will pass up any dish that has even a remote trace of mayonnaise.   But making a potato salad without any mayo seems blasphemous.  Limiting myself to only a tablespoon, I had to turn to milk and parmesan cheese to help me stretch the sauce.  Flavoring it with lemon, dill, oregano, and garlic gave it a fresher, light taste.  The recipe made just enough for a personal potato salad that lasted me two lunches.  It is well matched with sandwiches, burgers, or even just by itself.  Not a standard stick-to-your-sides winter meal, but it keeps you wishing for sunny days!

Potato Salad                                              
Ingredients:
1 large potato, diced
¼ red pepper, diced
2 medium stalks celery, sliced
2 hard boiled egg whites, chopped
1 T mayonnaise
2 T milk
¼ cup parmesan cheese, finely shredded
2 tsp lemon juice
1 tsp dried dill weed
¼ tsp dried oregano
½ tsp garlic powder
Salt and pepper
Instructions:
1.       In a saucepan, boil potatoes for about 10 minutes or until just fork tender.
2.       In another small saucepan, boil eggs for 8-10 minutes.
3.       In a small bowl, combine mayo, milk, cheese, lemon juice, dill weed, oregano, garlic powder, and salt and pepper to make sauce.
4.       Combine sauce with the rest of the ingredients.
5.       Chill for at least 2 hours.

Saturday, January 22, 2011

Sesame Sauce


For those of us trying to save a buck, Chinese food is a classic take-out option.  Granted, what they sell at China House or Panda Express is heavily Americanized “Chinese food”, but you can generally walk away with pounds of food for some loose change.   My $4.50 always feels well spent.  Occasionally though, the MSG-flavoring accosts my taste buds and puts them into a salty headlock.  Not even the sticky rice can save me.  

Wanting to keep the salt-and-soy-sauce taste to a minimum, I made a sesame sauce over broccoli, red pepper and rice.  The sauce was smoky and sweet, accentuated by a tinge of vinegar.  I drizzled the sauce over a plate of crisp steamed vegetables and rice.  If you make a fair amount of Asian food, soy sauce should not be the only flavoring weapon in your arsenal.  While soy sauce is a necessity, I would recommend adding sesame oil as well.  This oil adds a rich, smoky taste to sauces and pairs well with chicken and vegetable dishes.  Sticker shock might coax you to avoid this selection, but when you use only a teaspoon at a time it is well worth the investment.  The next asset you should have is Sriracha, an Asian chili (hot) sauce.   Its spicy garlic flavoring emboldens soups, sauces, and entrees.   This is not a complete or even extensive amount of Asian flavorings, but it will provide us with enough to vary the taste options in future cooking endeavors. 

Sesame Sauce

Ingredients:
2 ½ T white sugar
2 T all-purpose flour
½ cup vegetable/chicken broth
1 ½ tsp white vinegar
1 ½ tsp soy sauce
1 ½ tsp sesame oil
¼ tsp sriracha hot sauce
1 tsp minced garlic

Instructions:
1.       Combine sugar and flour in small sauce pan. 
2.       Turn stove on to medium heat.  Add broth, vinegar, soy sauce, sesame oil, sriracha and garlic.  
3.       While whisking contents, bring to a boil. 
4.       Then reduce and simmer for about 5 min.

Tuesday, January 18, 2011

Orange Cinnamon Swirl Bread


“Sharing is caring”, so it’s convenient when bread recipes yield two loaves.  Yet, when each gooey slice melts in your mouth to a citrusy sweetness, sharing starts to seem a bit too generous.  I want it all.  Unfortunately you cannot hide the evidence with bread.   You do not need to see a dusting of flour or a preheating oven.  The olfactory sense is the great detective in this case.  A baking loaf is a ticking-tummy-time-bomb.  About the time the buzzer dings, a group of entranced people have gathered around the oven door.  Our noses tingle as we search out the source of that saccharine smell; a near primal urge.  I have been known to devour an entire loaf fresh from the oven.  It’s just that good.  It even won me a first place blue ribbon when I made it in my Brownie troop oh so many years ago…
Like most homemade bread recipes, the process is involved; demanding that it be made only on special occasions.  But that would be a tragedy.  Orange and cinnamon invigorate the senses without weighing down the airiness of the bread, making it a perfect complement to any meal.  The frosty icing on top would have you thinking it is a cake, but be assured that the texture is that of a sweet bread, not a pound cake.
Reluctantly, I shared the second loaf; though I only saw about two pieces of it.  Apparently it was enough to quell the sweet-starved belly beasts of more than one person.  So whether you are preparing something for a Sunday brunch, afternoon tea, or dessert, Orange Cinnamon Swirl is sure to impress any company.  

Orange Cinnamon Swirl Bread
     
 Ingredients:
6 cups bread flour, approximately
2 packages dry yeast or 4 ½ tsp
1/3 cup nonfat dry milk
½ cup granulated sugar
1 ½ tsp salt
1 ¼ cups hot water (120-130˚)
¼ cup ( ½ stick) butter, room temperature
 1 T grated orange peel
¾ cup orange juice
1 egg, room temperature
1 T ground cinnamon mixed ½ cup sugar
2 T water
Frosting:
1+ cup confectioners’ sugar
1 tsp grated orange peel
4 tsp orange juice

Instructions:
1.       Measure 2 cups flour into a large mixing bowl and add the dry ingredients.  
2.       Pour in hot water and stir vigorously to blend into thin batter. 
3.       Add the butter, orange peel, orange juice, and egg.
4.       Add flour, ½ cup at a time.  Stir until shaggy mass that is workable on floured surface with hands.
5.       Knead for about 8 minutes by hand.  Add flour to achieve desired moisture content – should not stick to hands or be too dry.
6.       Place dough in lightly greased bowl (use vegetable/canola oil), turning the dough to be covered on all sides.
7.       Cover bowl tightly with plastic wrap and put aside in warm place to rise until it has doubled in bulk – about 1 hour. 
8.       Fold back plastic wrap, punch down dough.
9.       Turn onto floured surface and divide into two pieces.  Cover with wax paper and let rest for about 10 min. 
10.   Roll each piece into a 15”x7” rectangle, about ½” thick. 
11.   Use a spray bottle with water to wet the dough, then sprinkle cinnamon/sugar mixture on top.  Spray again to smooth out texture. 
12.   Roll dough from the narrow side.  Seal the edges by pinching tightly along the seams.  Tuck in the ends and place seam down in bread pans. 
13.   Cover the pans with wax paper and let stand until the dough has doubled in bulk, about 45 minutes.
14.   Preheat oven to 375˚ 20 minutes before baking.
15.   Bake for 10 minutes, then reduce the heat to 325˚ and bake for 30 minutes more, or until the loaves are nicely browned and test done when tapped (sound should be hard and hollow).
16.   Remove loaves from oven, let cool on rack. Then ice with the frosting.
Makes 2 (decadent) loaves

Thursday, January 13, 2011

Featured! in 25 College Blogs Every Parent Should Read

2011. Excitement and anticipation of the upcoming year buzzes like a pair of hand held beaters.  For some, this year marks graduation.  Whether it is you or your child, it will be monumental.  Freedom from parents (or freedom of kids) brings a new set of trials and tasks.  Some kids are ready to head out and other parents are clinging to hang on.  Parent or child, regardless, you have questions.  Students are plagued with what clothes to bring, where to buy books, who my roommate is going to be, etc.  Parents wonder how much money their child will need, if they will go to class, will they make all the right decisions for their future.  To answer many of these questions, I would recommend the article:  25 College Blogs Every Parent Should Read

And this is not just because Rachel vs. Ramen was featured (okay, well perhaps this has something to do with it).  Accredited Online's College's concise, yet comprehensive list gives you a start in the right direction on where to find the answers to your collegiate questions. 

My biggest question was: what will I eat?  

Unwilling to restrict my diet to Ramen noodles and granola bars, or forage through the cafeteria troughs again, I collected my thrift store Revere ware and the $1700+ (PER semester!) I would have spent on my college's recommended meal plan, and cooked on my own.   In my first semester off the meal plan I only spent $700 and even lost 8 lbs!  Now those are the kind of results everyone loves.  My blog strives to give people options for eating healthy and gourmet on a budget, from a college student's perspective. I hope that you have found it helpful in this sense as well.  


Sunday, January 2, 2011

Live Lobsters for New Years Eve


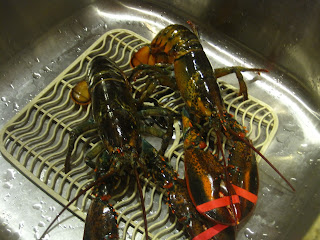
When we picked up lobsters for New Years Eve dinner, I was sure that the evening would be something out of a Hollywood horror movie, “Attack of the Lobsters”.   This year my family and I tried our hand at cooking live lobsters.  What says classy more than lobsters and champagne?  Plus, the grocery was having a sale on these lobsters: $8.99 a pound. 
Once the lobsters were unloaded, all people present were prepared for the invasion.  Fresh out of the bag, our monster stars looked like giant, creepy alien insects.  The creatures sat on the counter with antennas waving, large claws clamped with rubber bands, hairy legs, and a fishy smell.   Was I really about to eat this over-sized aquatic bug?  Surprisingly, their menacing qualities did not go further than appearance.  After washing them off and putting them in the sink, they laid dazed and docile.   Perhaps they did not realize the pot of boiling water had their names on it. 
Chatter in the kitchen centered on the actual boiling of the lobster.  Would it scream and cry for a prolonged period?  Kick the lid off in a struggle for life?  Clad with oven mitts, tongs, and stainless steel cookware, the tension mounted.   Maybe the lobsters were just waiting to attack!  The movies have sold us on thinking this would be the case.  However, only two were mildly eventful: one cried for about 5 seconds and another one protested by flapping its tail as I dropped it in.  I hardly know why the banter about the ethics of cooking a live lobster exists.  The cry was so faint and whistle-like it was barely audible.  Most of them fell limp into the water, and in a matter of minutes were completely cooked.   No fight to the pot, no pleas for life – just the sound of bubbling water and a vent fan.  I suppose this lack of drama and excitement is the reason you have never heard of an actual movie called “Attack of the Lobsters”. 
As the apprehension released, the cooking process became like clockwork.  Boil the water, plop in the lobster, and cover for 15 minutes or until red.  Each lobster had their own personal, aromatic steam bath, however if you are cooking for more than two I would not recommend the individual attention.  If your pot is big enough you can cook two at a time.  My pot was about 6 quarts, though I would recommend an 8 quart pot because I had trouble with water bubbling over.  The lobsters’ lack of personality and pizzazz did not affect their taste.  They were still meaty and divine, especially when dunked in butter.  The lobster tail is often touted as “the best part of the lobster”.   However, our table voted for the tender, plump claw and leg meat as king. 
So if you can boil water, you can cook your own lobster.  It takes some time to get over first appearances, but fresh lobsters will be a food you will gladly have for dinner again.
*Note: on further lobster investigation, I have learned NOT to rinse lobsters with tap water or put them in a bucket of tap water.  This suffocates them, making them a little dead.  And is perhaps why their final struggle was so light.
**Second Note: I do not yet have an adequate guide on how to eat the lobster.  I was too hungry and lazy to do it methodologically – it was pretty much caveman style.  But I would refer you to this internet site on how to crack and eat a whole lobster: http://www.thekitchn.com/thekitchn/how-to-eat-a-whole-lobster-118405?image_id=1477239

Cooking a Live Lobster
1.       Fill a large pot [at least 6 quarts] halfway with water.  Season with salt, pepper, thyme, parsley, rosemary, bay leaf.  Bring to a rolling boil.
2.       Gently place lobster head first into the boiling water, be careful of the tail – it may flap.  You do not have to remove the rubber bands from the claws prior to cooking.
3.       Cover with lid and hold making sure that there is no struggle [especially if you have more than one in the pot], reduce heat slightly so as to prevent over boiling.  If it begins to over
4.       1 lb. lobster 9 - 10 minutes
1 1/4 lb. lobster 10 - 11 minutes
1 1/2 lb. lobster 11 - 12 minutes
2 lb. lobster 12 - 13 minutes
5.       Meanwhile, melt a stick of salted butter with a few squirts of lemon juice for dipping.
6.       Remove lobsters from heat, let cool – these crustaceans are hot!