Thursday, September 23, 2010

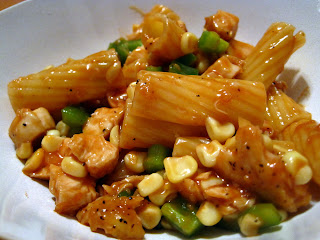
More than One Way to Get Sauced: Barbeque Chicken Pasta Salad

Some like it hot. Others like it with a twang of vinegar or a smidge of smokiness. I like it sweet and buttery. I am a Southern Girl after all. Ah, can you smell that smoky charcoal burning? Hear the crackle of the flame? See the coals or chips turn from inky black to sooty white? This is a regular barbeque. The flavors of the grill mixed with the taste of slow roasted meats are enough to make you want eternal summer. Alas, most of us college kids don’t have a grill. Buzzkill, right? Now you’re craving barbeque, but you don’t have the means to make it happen. My suggestion: get sauced.

“Wait, what? It’s only noon!” No, no. I’m talking about barbeque sauce.

So you are in this cramped, closet-like dorm kitchen with little more than a mini fridge and an easy-bake oven. You definitely don’t have a grill; doesn’t matter. You can turn even a piece of rotisserie chicken into a barbequed bird by just beginning with the sauce.

Barbeque sauce has to be among the most variant food traditions I’ve come across. Unless you are buying it from the bottle, you cannot have the same type twice. Restaurants might have a “secret recipe”, but you know there is someone in back taste-testing it to her particular preference. Having a recipe may seem sacrilege for those barbeque-ers who cook with the soul, but it’s a necessary crutch we all need until find the barbeque sauce that speaks [to] our tongue.

The best thing about this pasta salad, surprisingly, was that it was cold. The sweet, juicy chicken smothered in buttery barbeque sauce, tossed with fried corn and fresh green peppers was enough to make your mouth say “mmmmm”. It’s the best of your backyard barbeque all made on your stovetop. And it can be eaten cold! What’s not to love? So, when you find yourself reminiscing about a summer forgotten, make yourself a batch of this Barbeque Chicken Pasta Salad.


Barbeque Chicken Pasta Salad

Ingredients:

1 chicken breast

1 T olive oil

Salt and pepper

About 2 cups pasta

1 ear of corn/ ½ cup frozen

2-3 T butter

½-1 cup chicken broth or water

1 fresh green pepper, diced

Barbeque sauce [basic directions to follow]

Instructions:

1. In a medium pot, make pasta. Once cooked, rinse with cold water. Place in large container, set in fridge to chill.

2. In a skillet, high oil until hot. Salt and pepper the chicken. Pan sear – be careful not to overcook. Cook about 3-5 min a side [check inside, not pink].

3. Remove chicken after cooked, allow to cool. Then cut into bite sized pieces and add to pasta container.

4. In same skillet, fry corn and butter for about 5 min. Slowly add water, bring to a boil. Cover. Cook until corn is soft and cooked through.

5. Remove from heat. Toss corn and diced peppers with chicken and pasta. Store in fridge.

6. Make barbeque sauce. Mix all together, chill, eat!

Barbeque Sauce

Ingredients:

¾ c ketchup

3 T butter

3 T brown sugar

1 t Worcestershire sauce

1 T vinegar

2 t lemon juice

1 t mustard

2 T minced onions

1 clove garlic, minced

Salt and pepper

Instructions:

1. Mix all together in small saucepan over medium low until hot.

2. Taste test! See what you like.

3. Remove from heat to cool slightly.

4. Add to pasta salad.

5. Eat!

Tuesday, September 21, 2010

Basil Pesto Tuna Salad with Havarti, Kalamata Olives, and Tomato with Dijon Vinaigrette

Wow. What a mouthful, right? That’s exactly what I thought with a mouth full of this playful, zesty salad. Hunks of still-pink, seared tuna, soft havarti cheese, ripe Kalamatas and fresh, red tomatoes laid gently on top of a delicate bed of lettuce was picturesque for a hungry belly. It appears that I apprehended a copy of the latest menu item from some trendy, upscale restaurant. College kitchens can be more chic than we get credit for. We know that tuna steak is different from tuna fish [in a can]. Tuna steaks gained popularity during outbreaks of “mad cow disease” as an alternative to beef steaks. Quite the choice as tuna steak is quite flavorful, not too fishy, can be eaten rare, and has protein enough to rival our dearly beloved steak.

Salads can brag about the use of the full color spectrum: green lettuce, yellow corn, red pepper, black beans, etc. But when they also can boast the gamut of taste: savory, sweet, zesty, salty, etc. – unroll the red carpet! That deserves a Golden Bowl Award. My celebrity salad tonight featured: ruffled green leaves, pleasantly crisp; tuna smothered in basil pesto had an aromatic smell and a meaty taste; havarti, kalamata olives and tomatoes made the perfect triad of buttery, briny and sweet; and a zesty Dijon vinaigrette tinged with lemon and vinegar drizzled on top. Poor lettuce; she is consistent, but often upstaged by the many five star toppings that sit on top of her.

This won’t be some “nobody” salad you will find at your local cafeteria salad bar, so impress your friends with your debut salad while you can. Keep toppings, lettuce and dressing separate so that you can bite into fresh salad fixin’s every time afterward.

Basil Pesto Tuna Salad with Havarti, Kalamata Olives, and Tomato

Ingredients:

About 2-3 T basil pesto

1 T olive oil

1 tuna steak

Salt, pepper, garlic

Havarti Cheese, diced

Kalamata olives, sliced

Tomato, diced

Head of your favorite lettuce

Instructions:

1. Heat a frying pan over medium high heat until hot. Add 1 T olive oil. Season tuna with salt, pepper and garlic. Place on frying pan.

2. Sear tuna for about 2-3 min per side. [Should appear still dark red inside, just browned about a ¼ in – it’s safe to eat!]

3. Remove from heat, let cool to room temperature.

4. Rub with basil pesto, slice into bite sized pieces.

5. Prepare other toppings. Toss with salad. Drizzle with dressing.

Admittedly, the Dijon Vinaigrette was made up on the fly, without measurements but basically here it is:

Dijon Vinaigrette

Ingredients:

2 T Dijon mustard

1 T red wine vinegar

3 t lemon juice

2 brown sugar

One clove garlic, minced

Salt and pepper

½ cup vegetable oil

Instructions:

1. Mix together all ingredients except oil.

2. Whisk in a small stream of oil into thickness.

Wednesday, September 15, 2010

Give “Piece” a Chance: Key Lime Pie

There is a certain deficiency in one’s diet that is too often overlooked: key lime pie. Can’t remember the last time you had it? I would bet that it’s either because someone else gobbled it up too quickly or you only get to have it on that rare summer evening. This decadent, creamy pie is so rich you might think it is chocolate. But the light, bright finish of lime lifts the heaviness and makes you want at least one more slice [even if this is your third already].

Pies begrudge cakes because they tend to always end up neglected. Who in college has time to bake a pie? [Or can spare the calories to eat one!?] This recipe for key lime pie gives a new meaning to “Easy as Pie” taking really only about 5 min of prep time, 15 min of cooking, and 2 hours “hands-off” chilling, It is also storable in the freezer for about 2 weeks, if you can hold yourself back that long. [This way you can evenly disperse caloric intake over the next few days…right?] The longest you will wait is the chilling period, which although it can be equally as maddening, has a definite payoff.

Choosing to freeze the pie was a critical part of this pie-rfect key lime pie; an observation made by my roommate. It kept longer and the consistency was much better. Instead of pudding, it was like smooth ice cream.

The moral of the story: give “piece” a chance. A piece of pie that is.


Key Lime Pie

Ingredients:

Graham Cracker Pie Crust

2 [14oz] sweetened condensed milk

1 cup lime juice [fresh squeezed – will take about 6 limes]

2 whole eggs

1 cup sour cream

¼ cup powdered sugar [make it as sweet or sour as you desire]

1 tsp grated lime peel

Instruction:

1. Preheat oven to 325˚ F.

2. In a separate bowl, combine sweetened condensed milk, lime juice and eggs. Whisk [or stir vigorously with a fork] until well combined.

3. Pour into graham cracker crust, bake for 15 min.

4. Chill in fridge for at least 2 hours.

5. Combine sour cream and powdered sugar in small dish. Spread on top of pie. Sprinkle lime peel as garnish.

6. Place in freezer until solidified.

Saturday, September 11, 2010

Rib Eye of Desire: A New Outlook on Steak

Align Right

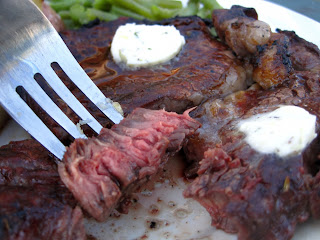
Steak: a thick slab of red meat; cooked rare, browned only slightly from the sizzle-marks of the grill; the fat as crispy as pork rind and the meat so tender and juicy it melts like butter.
It is not Webster’s definition, but it ought to be after what graced my dinner plate last night. Webster’s one-lined description did not adequately fit this Holy Cow. Sure, we started off with a not so “choice” cut of rib eye – we are college kids. It was however, our choice to transfigure it into a prime cut. In this case, the secret to quality is quantity. Large quantities of salt. You want the top of your steak to look like it’s experiencing a mid-winter salt blizzard.
Now before your face contorts in cringing, you do eventually wash off the salt. The reasoning behind using salt is to break down the proteins and improve the tenderness of the meat. Basically, you are taking your callous, tough-guy “choice cut” steak and whipping him into a suave, tender, whisper-sweet-nothings-in-your-ear “prime cut”. How much does this make-over cost? A trip to the grocery store for one bottle of coarse kosher or sea salt. [I actually got my 16 oz bottle at the dollar store – so it was less than a dollar considering I only used about 2 oz or so!] Although, I only spent $12 on two steaks, I managed to maximize the flavor through this method making it equivalent to any steakhouse cut. Pair with some roasted rosemary garlic potatoes and fresh green beans, sit down with some friends and relish your Friday evening.
There are two types of steak eaters: the devourers and the savorers. With the devourers, the plate will be left lonely in no time as there will not be a bite left of your steak. But you just couldn’t help yourself. It was a steak of the moment – you barely had to even chew it as it melted as graciously as butter on your tongue. For the savorers, each bite was so intoxicating you fell into a trance. Your senses overwhelmed, you took it slow just so you could give the appropriate reverence to this steak.
Admittedly, it seems a counterintuitive method to steak-love-making, but it will result in taste bud tingling goodness. Spoon a slab of flavored butter on top to rocket you off to another planet of steak excellence, and never come back.
Rib Eye of Desire
Instruction:
1. Dump COARSE salt on both sides your steak – leave little to no red meat visible. Trust me on this…
2. Depending on the size and thickness of your steak, let salt sit on top for about 30 min to an hour at room temperature. No need to cover – unless you have a fly infestation or something. You can also add seasonings such as thyme, rosemary, garlic, etc.
3. Thoroughly rinse off all salt mixture from steak. Pat dry.
4. Throw on a heated grill. Hear sizzle, flip. Hear sizzle, eat! But in all seriousness, I like my steak rare [you are doing yourself a disservice when you cook it past medium-rare: http://news.bbc.co.uk/2/hi/health/3743657.stm ].
Flavored Butter
Instructions:
1. Take about 4 T unsalted butter, let come to room temperature.
2. Cream together with minced garlic, fresh rosemary and thyme, salt and pepper.
3. Roll in plastic or wax paper into log shape.
4. Put in fridge until solid, about 30 min.