Thursday, October 13, 2011

Middle Eastern Spiced Burgers


Grilling: a traditional American culinary sport.  But do you cancel the game when it’s raining or too cold? A hamburger was sounding so good!  I doubt that your dollar store umbrella will hold up to the heat of standing over a grill for 30 minutes.  So, you gotta move it inside.  No, not the grill; the cooking.
Hamburgers on the stovetop may not have the same manly appeal or smoky charcoal  taste, but with the programmable heat of a stove top, you truly become “grill master”.   There is no waiting for the grill to heat up, or poking the coals in an attempt to distribute the heat.  The stove top ensures instant, even heat – aka the way to a perfectly cooked burger.   If you still want to cook with the dry heat quality of the grill, I would recommend using a well seasoned cast-iron skillet.  If you have a non-stick skillet though, I have a plan for that too. 
Diverging again from tradition, I chose to season by hamburger with Middle Eastern spices like allspice, cumin, coriander, and cayenne, and fresh parsley from the herb garden.  When I season burgers, I use the smell test – if you can smell the spices, not faintly or overwhelmingly, you are golden.  (It’s kinda like that smell test you use when you wake up and decide that this sock is clean and that one is…ugh, not.) Egg, olive oil, and breadcrumbs were my binders, so the burgers wouldn’t fall apart while cooking.  As for the cooking device, the cast-iron was dirty, so the non-stick frying pan won out.  So instead of technically grilling these burgers, they were semi-deep fried in olive oil.  Great choice.  These burgers had a crispy outer crust, but were still dripping on the inside with juices, and loaded with fragrant spices.  
The last thing I would recommend is smearing your burger with a dollop of plain Greek Yogurt, and pairing with with thin slices of tomato and cucumber.  So, while it’s not your all-American cookout-style burger, it may be your new favorite creative alternative.     

Middle Eastern Spiced Burgers
Ingredients:
1 clove garlic, finely diced
¼ cup onion, finely chopped
½ cup fresh parsley, chopped
1 T lemon juice
1 lb ground beef (80/20 or 85/15, don’t go too lean)
½ tsp ground cumin
½ tsp ground coriander
¼ tsp ground allspice
¼ tsp cayenne pepper (can substitute regular pepper too)
1 tsp salt
1 egg, slightly beaten
½ cup bread crumbs
2 T olive oil + about ½ cup, divided

Instructions:
1.       Using your hands, mix together all ingredients, except ¼ cup olive oil, until well combined. **Do not over work meat, as it will make your burger tough. 


2.       Preheat medium sized skillet with ¼ cup olive oil over medium heat. **DO NOT let oil smoke, or get too hot.
3.       Form six 1-inch-thick patties with ground beef mixture. 

4.       After verifying oil is hot (hover hand over oil to feel heat or place piece of bread to see if the oil sizzles and browns the bread), gently place patties in oil 3 at a time. Oil should sizzle once beef is placed in. 
5.       Cook over medium heat for about 4 minutes per side, flipping once.   

6.       Once browned and cooked through, remove from oil and place on paper towels to absorb remaining oil.   

Friday, September 16, 2011

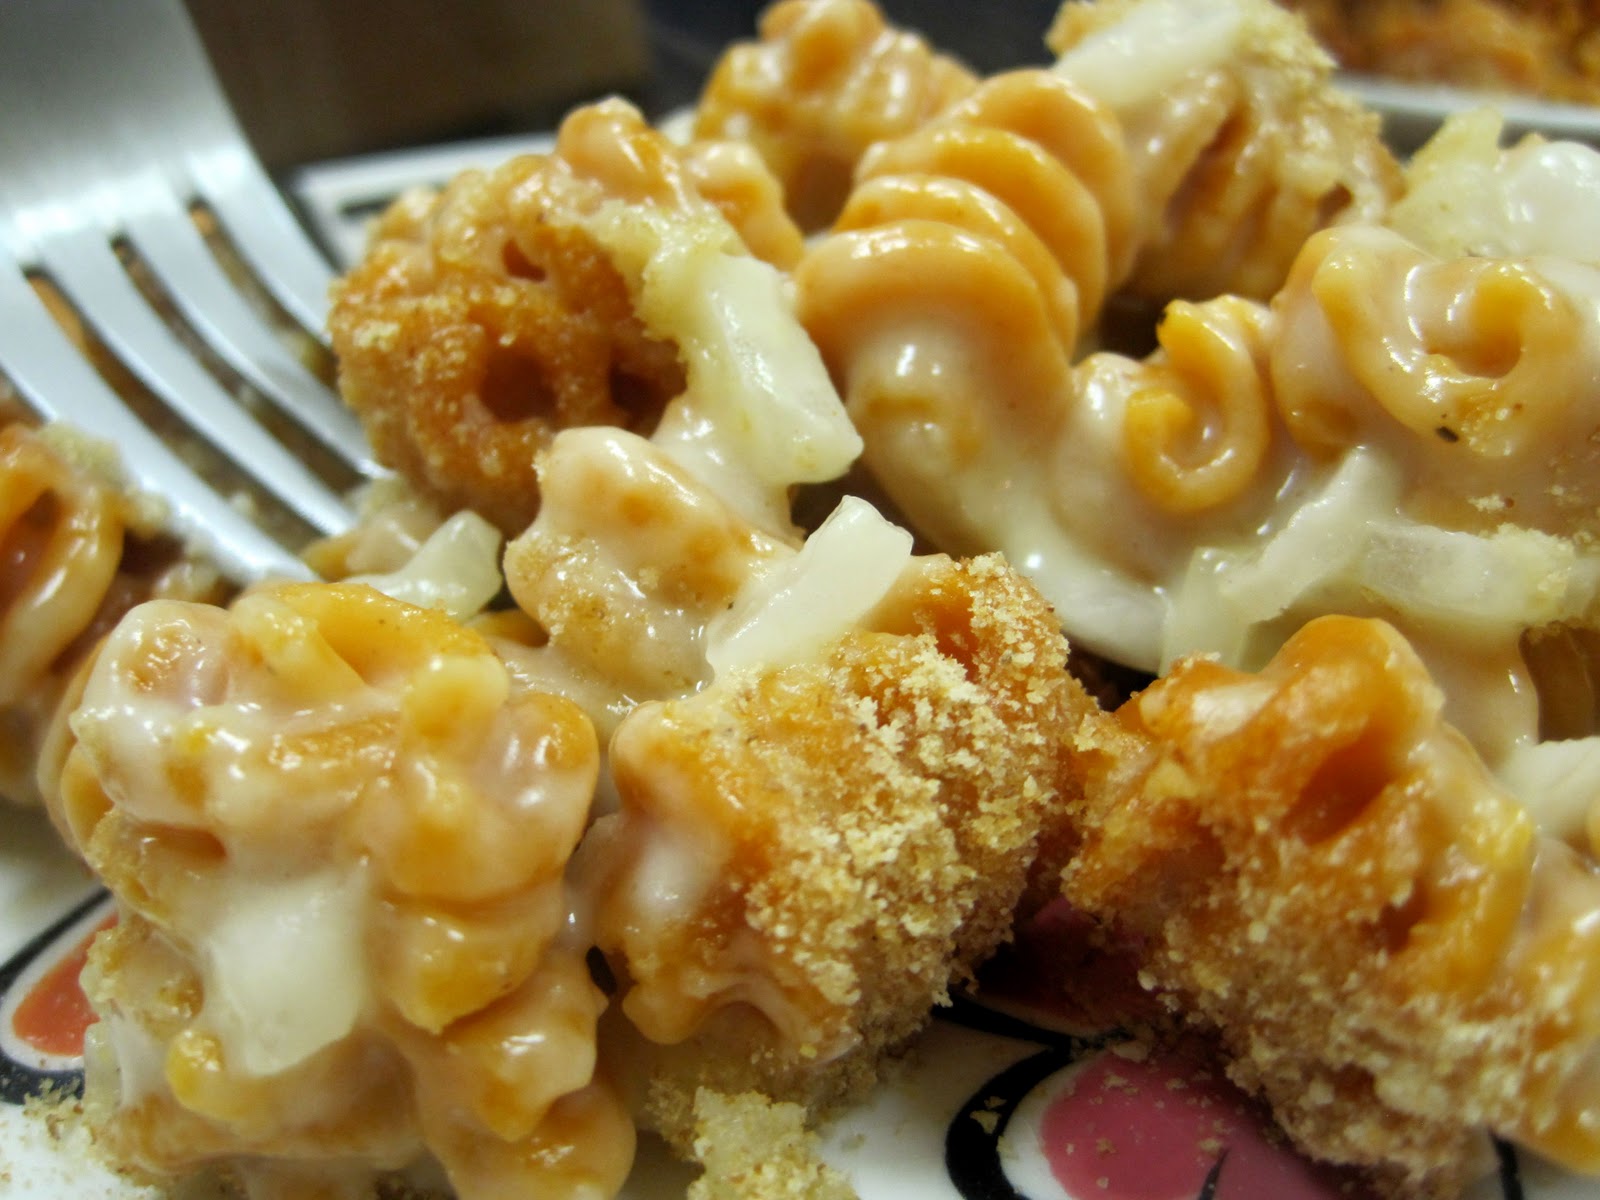
Pappardelle’s Extreme Habanero “Mac and Cheese”


Both masochists and hedonists can love habanero peppers.  Whether they are in it to feel the stimulating rush of endorphins or to sweat out the toxins from last night’s bar tab, people love when the food “makes them hurt so good”.  So, in my pursuit of embracing spicy food, I decided to try out Pappardelle’s Extreme Habanero Radiatore Pasta.  Heeding the warning of the package label, I anticipated that a combination of pain and pleasure would be involved in eating this fiery pasta.   
 I used to think you either had to have a sick sense of fun or a callous tongue to chomp down whole peppers at once.   My tongue would almost blister at the slightest hint of heat; how could they tread so boldly, and enjoy it?  It’s one of those addictions where you work your way up.  You aren’t born loving spicy food, and you probably didn’t love it even after the first time.  But if you happened to be raised on habeneos, jalapenos, and Anaheims, you would soon develop a tolerance, perhaps even affinity, for spicy food.  So were habaneros too much for the novice?  
 Assuming the milk would tone down the capsaicin from the peppery pasta, we made a Habanero Macaroni and Cheese.  The recipe we used was standard, but the taste sends out flares to heat-lovers.   Pleased that it was nothing like eating Easy Mac and hot sauce, I praised the depth of flavor I got from the pasta alone.  We hardly seasoned the pasta – it brought its own specific flavor profile.  As my sinuses cleared, I enjoyed the habanero’s separate layers of heat: the initial tingle on my tongue, then the radiant warmth from the second bite, and finally the fiery finish.  After a few days of sitting in the fridge, the heat had intensified to a point where it had to be diluted with other pasta.  Like the label says, this is EXTREME.  I do advise those who consider Tabasco “as spicy as they can go” to avoid tackling this pasta; it was hot even for those who had eaten habaneros before. But if hot wings and Sriracha just aren’t doing it for you this week, this is your pasta.  Those whose palates crave painful pleasure or covet pleasurable pain, we salute you. 

Extreme Habanero “Mac and Cheese”
Ingredients:
½ lb Pappardelle’s Extreme Habanero Radiatore pasta
1 T olive oil
4 T butter, unsalted
4 T flour
2 cups 2% milk (may need more/less liquid, add in increments)
1 cup Extra Sharp Cheddar Cheese, shredded
2 cups Monterey Jack, shredded
½ small onion, finely diced
3 t Worchester Sauce
Salt and pepper to taste
½ cup breadcrumbs
½ cup parsley 
Instructions:
1.       In a large saucepot, cook pasta until al dente (slight crunch in the middle).  Rinse with cold water and toss with about 1 T olive oil so it will not clump and stick. 
 2.       In another saucepot, melt butter over medium heat.  Add flour to make a rue. 
3.       Take pot off burner when first adding milk; return pot to medium low heat and stir mixture constantly.  Rue should thicken, milk should not scald.  

4.       Add in cheese, one cup at a time.  Stir until cheese mixture has a creamy consistency.

5.       Add in Worchester, salt, and pepper.
6.       Add in pasta, mix well.  Keep over medium heat until pasta mixture is warm.   

7.       Meanwhile, preheat oven to broil (500˚ F).
8.       In a large casserole dish, pour pasta and cheese mixture.
9.       Sprinkle bread crumbs and parsley on top. 

10.   Broil for about 10-15 minutes, or until top of mac and cheese is browned. 

Wednesday, August 24, 2011

Chickpea and Green Bean Succotash


 Back in the dorms it’s the first day of classes; summer is dead.  We have swapped beach balls for ball point pens, sun screen for laptop screens.  Yet summer can live on in our meals, at least for a couple more weeks.   Tired of the stuffy classrooms, I wanted dinner to be bursting with sunshine vegetables like sweet corn and green beans.  Not feeling overly creative – I am still allowed a warming up period, right? – I decided to make a different version of succotash.  Of course, corn is the golden star of this dish, but instead of lima beans I chose chickpeas, and added green beans.   To season it, I used fresh herbs for that ‘just picked’ pop of flavor.  While I do prefer fresh over dried, the dankness of my dorm room isn’t conducive to plant growth (mold on the other hand…), so I’ll end up using dried by October, don’t worry.
 After the cooking was complete, I heaped spoonfuls of the sweet, buttery corn, chickpeas, and green beans onto my plate.  The hearty qualities of this vegetarian side dish will fool you into thinking it is a slow cooked meal.  The rosemary and thyme give it a fragrant scent and savory taste, and the butter adds a velvety texture.    A perfect meal to bridge the gap between summer and the fall semester…now let’s hope I can transition as well into my class work…

Chickpea and Green Bean Succotash
Ingredients:
3 T butter, divided
1 clove garlic, finely chopped
3 ears of corn (or about 1 ½ cups frozen corn)
2 cups fresh green beans
1 can garbanzo beans, do not drain
1 tsp fresh rosemary, chopped
1 tsp fresh thyme, chopped
1 tsp fresh basil, chopped
Salt and pepper, to taste
Instructions:
1.       In a medium sized pot, bring about 3 cups of water to a boil. 
2.       Blanch green beans in boiling water, about 3-5 minutes.  Drain and rinse with cold water.
3.       Meanwhile, in a large sauté pan, melt 1 T butter over medium high heat. 
4.       Quickly cook garlic until golden brown, about 1-2 minutes.
5.       Remove pan from heat. 
6.       In the pan, position cob upright.  Using the pan to catch the corn kernels, take a large knife and slice straight down the side of the cob (do not make deep cuts, only enough to remove the kernels; think parallel slide).    

7.       Add remaining 2 T butter and cook corn for about 5-6 minutes over medium heat, stirring occasionally. 
8.       Add in green beans, garbanzo beans (plus reserved liquid), and herbs; reduce heat to medium low.
9.       Cook until liquid has been absorbed and vegetables are tender, stirring occasionally, about 7-10 minutes.   
Serve warm.  Makes about 3 cups.  Great with cornbread muffins. 

Wednesday, August 17, 2011

Summer Break

"Hey! Can you grab the balsamic vinegar next time you go to the car?" Yes, this has been my life for the past month or so.  Long story short, August has been somewhere between chaos, couch surfing, and our kitchen in the car.  Though it felt hot enough to bake bread in the glove box, we didn't manage to test that one out (eggs can scramble on the outside of the car, but I wouldn't try that if I were you).  Needless to say, I apologize for not updating the blog more often.  Once I get settled in for this semester, I will be right back in the kitchen.  So good luck to all that are moving around right now -- I will be back in a few days with some tasty concoctions and recipes to go along :)  

Wednesday, July 27, 2011

Cucumber Avocado Soup


Summer rocks until you have been assaulted by a heat index of 114˚ and your kitchen isn’t air-conditioned.  All the food that could melt does; probably because you are constantly opening the freezer door just to cool down.  Needless to say, you want to minimize your time slaving over a hot stove (or stopping to take step-by-step pictures – my apologies, dear foodies).   Thus, a cold cucumber avocado soup won out after a friend dropped off a five pound bag of summer squashes, cucumbers, and peppers.   

After peeling, seeding, slicing, and simmering the cucumbers they turned from crisp and cool to soft and savory.  Cucumbers being mostly water, I never thought to cook a ‘cuke.   Although I admit I was skeptical at first, I have been won over.  There is something familiar and yet adventurous about cooking cucumbers.  Adding avocado was the secret to a smooth, silky texture and nutty, buttery flavor.  To brighten the soup, I used cilantro, dill weed, and mint for their tingly citrus notes and grassy-green taste.  
Once I had finished blending the soup, I took a taste of the warm cucumber soup and actually found that I preferred it over the cold soup.  (Ah the merits of taste testing along the way…) Eating the soup cold had its perks – it basically tasted like a thinner guacamole, yum! –  but the heat of the jalapenos did not blossom without heating the soup, and the cold soup’s texture became a bit strange after bowl two.   Overall, the soup was a successful attempt at minimizing time in the kitchen and maximizing my eating enjoyment (even when I can’t get the thermostat any lower than 85 without my AC busting).
Cucumber Avocado Soup “Cold Guacamole Soup”
Ingredients:
2 T EVOO
2 cloves garlic, finely diced
1 small onion, diced (about ¾ cup)
1 T fresh lemon juice
4 cups peeled, seeded, and thinly sliced cucumbers
1 ½ cups vegetable broth
Salt and Pepper (to taste)
Dash of cayenne pepper
2 tsp jalapeno, finely diced
1 avocado
½ cup fresh cilantro, chopped
1 tsp dill weed, dried
1 T fresh mint, chopped
½ cup plain yogurt
Instructions:
1.       In large saucepan or high-walled skillet, heat oil on medium-high heat.
2.       Add onions, cook for about 2 min.  Then add garlic, cook for an additional 2 min. 
3.       Add lemon juice and cook for 1 min.
4.       Add cucumber slices, broth, and season with salt, black pepper, and cayenne.
5.       Reduce heat and cook at a gentle simmer until the cucumbers soften, about 6-8 min.
6.       Take skillet/pan off heat; let cool for about 5 min.  Transfer soup to a blender. 
7.       Add avocado, cilantro, dill weed, and mint; blend on low speed until smooth.
8.       Pour into bowl and stir in yogurt.  Garnish with fresh diced cucumber and cilantro.
Soup can be enjoyed hot, or can eaten cold after being chilled for about 2-4 hours.

Monday, July 18, 2011

36-Hour Chocolate Chip Cookies


A Jacques Torres adaptation 
 Warning: if you are looking for purely instant-gratification cookies, stick to Nabisco.  But if you start now, you are only a day and a half away from your awakening.  Yes, in a little over 36 hours your eyes will open and your sweet tooth will swoon over the best chocolate chip cookies you ever sunk your teeth into.  A golden, sugary outer shell encrusts a still warm and gooey dough center.  The climax is the realization that you have just tasted a cookie with the perfect proportion of crisp baked cookie and raw cookie dough.  Every cookie you have tasted before becomes inferior.  Sure, Grandma’s cookies may continue to maintain that nostalgic tastiness, but you are hooked to these even before you swallow the first bite.  The richness of the cookie is the only limiting factor.  Eating an entire cookie might seem doable, until you are halfway through and you can already feel a significant rise in your blood pressure.  But rest assured that these cookies are worth the wait, the tooth-ache, and the possible cavity to come.    
 I’m sure you are wondering why the 36 hours.  This method may seem arcane, but in fact, the rest period is what creates cohesive dough.  It allows the wet ingredients to be fully absorbed into the dry ingredients.  Eggs are gelatinous and take time to absorb, especially when butter acts like a coat of armor for the flour. Thus, drier, firmer dough means that the eggs and other liquids have been sufficiently soaked up into the flours.  This should mean that you will enjoy a better baking consistency.  Better baking consistencies lead to crisp edges and chewy centers – the way all cookies should be.
As for the other secrets, I found that using cake and bread flour make for better consistency as well.  Your next secret is 2 ½ sticks of butter.  TWO and a HALF STICKS of butter.  (I never claimed they were healthy.)  But you can’t skimp on the butter or sugar, as they are the reason these cookies melt into toffee-flavored syrup in your mouth.  My favorite “last touch” is the coarse salt sprinkled on top of the cookies.  It completes them.  
 Served fresh from the oven they are enough to corrupt even the most devout diet.  Perhaps you could fast for the 36 hours leading up to the baking? Haha, just kidding. So if you are aiming to outdo the competition, I recommend these cookies served fresh, with a tall glass of milk. 

36-Hour Chocolate Chip Cookies
Ingredients:
1 ¾ cups all-purpose flour + 4 T cornstarch (Or 2 cups cake flour)
1 2/3 cups bread flour
1 ¼ tsp baking soda
1 ½ tsp baking powder
1 ½ tsp coarse salt
2 ½ sticks ( 1 ¼ cups) unsalted butter
1 ¼ cups brown sugar
1 cup + 2 T granulated sugar
2 large eggs
2 tsp natural vanilla extract
1 ¼ lbs semi-sweet chocolate chips
A few pinches of sea or kosher salt

Instructions:
1.       In one bowl, using a whisk, combine flours, baking soda, baking powder, and salt in a bowl.  (You can use a sifter too, if you have it.) Set aside.
 2.       In a larger bowl, cream together butter and sugars until very light.  (By hand this will take you a while – making sure the butter is at least at room temperature will help.)
 3.       Add eggs to butter and sugar, one at a time.  Mix well after adding each.
4.       Stir in vanilla.
5.       Add in dry ingredients, lightly mix until just combined.  
 6.       Add in chocolate chips.
7.       Press plastic wrap to dough and refrigerate for 36 hours (trust me it’s worth it).  Dough may be used in batches, and can be refrigerated for up to 72 hours. 
 8.       When ready to bake, preheat oven to 350˚ F.  Line baking sheet with parchment paper or sill pat. 
9.       Scoop 6 (3.5 oz – the size of engorged golf balls) balls of dough onto baking sheets.  Sprinkle with sea salt/kosher salt and bake until golden brown, but still soft, 18-20 minutes.
 10.   Cool cookies, but they are best enjoyed when warm. 
11.   Remaining dough can be refrigerated and baked later (up to 24 hours after).
Makes about 1 ½ dozen 5-in cookies.